
Guide to 3D Printed Liquid Cold Plates [+Cost Calculator]


Learn about 3D-printed liquid cold plates, covering materials, manufacturing technologies, design tips, and cost drivers.
Introduction
As power densities in high-performance computing (HPC), electric vehicles (EVs), and aerospace electronics continue to climb, traditional thermal management solutions are hitting a wall. The heat generated by next-generation AI chips or high-voltage inverters demands more than just standard cooling—it demands geometric innovation.
This is where 3D-printed liquid cold plates come in.
In this guide, we examine how 3D printing can be applied to liquid cold plate manufacturing, the key materials and technologies involved, design best practices, and the cost drivers you need to know.
What Is a Liquid Cold Plate?
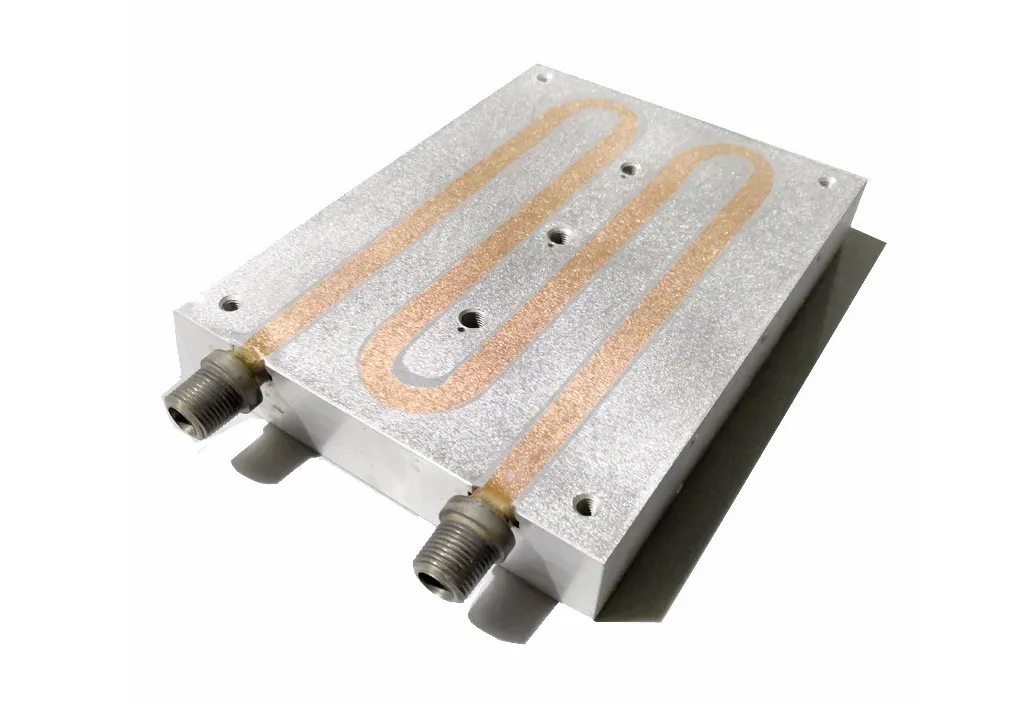
A liquid cold plate is a device designed to remove heat from electronic components. It works by circulating cool liquid through internal channels. The cold plate is mounted directly to the heat source, allowing heat to transfer into the plate and flow away with the liquid.
Cold plates are used when air cooling isn't enough—usually because the heat is too intense, space is too tight, or the temperature needs to be perfectly even.
For a more detailed explanation, see our article: Liquid Cold Plates (LCPs): Everything You Need to Know.
Why Use 3D Printing for Liquid Cold Plate Manufacturing?
Traditional manufacturing methods such as CNC milling and vacuum brazing impose strict limitations on internal channel geometry and part assembly, often forcing engineers to trade thermal performance for manufacturability.
These constraints typically result in simplified flow paths and multi-part constructions that limit overall cooling efficiency.
3D printing, or additive manufacturing (AM), removes many of these barriers by eliminating tooling and assembly constraints, enabling a more holistic optimization across design, performance, structural integrity, and production efficiency, as summarized below:
Design: Expanded Design Freedom
Performance: Improved Thermal Performance + Enhanced Flow Dynamics
Physical & Structural: Lightweighting Optimization + Structural Integration
Economic & Supply Chain: Material Efficiency + Reduced Lead Time
Traditional vs. 3D-Printed Liquid Cold Plates
The table below provides a detailed comparison of how additive manufacturing addresses the limitations of conventional cold plate production across seven key areas:
Feature | Traditional Manufacturing | Additive Manufacturing (3D Printing) |
|---|---|---|
Design Freedom | Limited. Constrained to drilled straight lines or simple milled channels due to tool access. | Unrestricted. Enables complex internal geometries like TPMS and Gyroids that are dictated by physics, not tooling. |
Thermal Performance | Standard. Smooth channels often result in laminar flow, limiting heat transfer efficiency. | Superior. Complex surface textures induce turbulence, breaking thermal boundary layers and increasing heat rejection. |
Flow Dynamics | Compromised. Sharp 90° turns cause pressure drops, stagnation zones, and hot spots. | Optimized. Organic, curved channels ensure even flow distribution and uniform pressure control. |
Structural Integration | Risk of Leaks. Multi-part assemblies (base + cover) rely on brazing or O-rings, creating failure points. | Leak-Free. Monolithic (single-piece) consolidation eliminates gaskets, seals, and joints entirely. |
Weight | Heavy. Solid blocks with excess material are often required for machinability and stability. | Lightweight. Topology optimization places material only where load paths dictate (30–60% lighter). |
Material Efficiency | High Waste. Subtractive processes machine away up to 90% of the raw block as scrap. | Sustainable. Near-net-shape process consumes material only where the digital model requires it. |
Lead Time | Slow. Requires weeks or months for tooling (molds/fixtures) before production starts. | Agile. Tool-free process allows production to start immediately; design-to-part in days. |
Applications of 3D-Printed Liquid Cold Plates
Additive manufacturing has moved beyond prototyping and is now a critical production technology for industries requiring high-performance thermal management.
By leveraging the geometric freedom of 3D printing, engineers can create cold plates that are lighter, more efficient, and tailored to specific spatial constraints across various sectors.
1. Data Centers & High-Performance Computing (HPC)
With AI driving thermal demands to new heights, AM is essential for modern data centers:
Direct-to-Chip: Enables GPU Cold Plates with micro-channels designed to target specific hotspots on high-density silicon.
Next-Gen Cooling: Handles extreme heat flux for architectures like NVIDIA’s Blackwell. GB200 Cold Plates utilize complex internal gyroids to maximize heat rejection in a compact footprint.
System Integration: Monolithic AI Server Rack & Cabinet Cold Plates integrate manifolds directly, simplifying plumbing and eliminating leak points across the server cluster.
2. Automotive & E-Mobility
Electric Vehicles (EVs): Custom cold plates conform tightly to traction inverters and battery packs, optimizing cooling for power electronics without adding unnecessary chassis weight.
eVTOL Aircraft: Where weight is the primary constraint, AM allows for variable wall thicknesses and integrated structural features, fitting into tight fuselage spaces while maintaining thermal stability.
3. Aerospace & Defense
Space Optimization: AM creates high-conductivity plates that fit into irregular volumes within avionics and satellites where standard heat sinks fail.
Leak-Free Reliability: Printing monolithic parts eliminates brazed joints and O-rings, ensuring long-term reliability for mission-critical electronics in high-vibration or vacuum environments.
4. Industrial Power & Renewable Energy
Power Electronics: Customized designs maximize surface contact with irregular IGBT modules and solar inverters, providing superior cooling in limited spaces.
Efficiency: Optimized internal flow paths reduce the pumping power required for the cooling loop, contributing to the overall system efficiency of renewable energy installations.
How 3D-Printed Liquid Cold Plates Are Made
To design and evaluate a 3D-printed liquid cold plate effectively, it is important to understand which additive manufacturing technologies are used, what materials are typically selected, and how the end-to-end production workflow is structured.
3D Printing Technologies for Liquid Cold Plates
While there are many ways to print metal, liquid cold plates are almost always made using Laser Powder Bed Fusion (LPBF). This is because cold plates must be 100% leak-proof and solid.
This technology is also known as SLM (Selective Laser Melting) or DMLS (Direct Metal Laser Sintering).
How It Works
The process builds the part layer by layer by selectively melting metal powder with a high-power laser. A thin layer of powder is spread across the build platform, the laser fuses the material according to the design, and the platform lowers. This sequence repeats until the part is fully formed.
Pros
Leak-tight integrity: Creates fully dense, solid parts that can handle high pressure without leaking.
Complex geometry: Can print tiny micro-channels and internal lattices that standard machines can't make.
Strong mechanical properties: Printed parts are as strong as (or stronger than) traditional cast metal.
Cons
Support structures: Overhangs need "legs" to hold them up during printing. Inside a cold plate, these are hard to remove, so you must design self-supporting channels (like teardrops).
Residual stress: The rapid melting creates heat stress. Parts must be heat-treated to prevent warping.
Materials for 3D-Printed Liquid Cold Plates
Selecting the right metal powder plays a key role in determining a liquid cold plate’s weight, cost, and thermal performance.
Although many metals are compatible with additive manufacturing, 3D-printed liquid cold plates are most commonly produced using two material families: aluminum alloys (such as AlSi10Mg) and copper alloys (such as CuCrZr).
AlSi10Mg
AlSi10Mg (Aluminum–Silicon–Magnesium alloy) is one of the most widely used materials in metal additive manufacturing. The addition of silicon and magnesium improves printability compared to pure aluminum, while maintaining solid mechanical performance.
Why use it: AlSi10Mg is a strong choice for lightweight designs. With a low density of approximately 2.67 g/cm³, it is well suited for applications such as electric vehicles and aerospace systems, where weight reduction is critical.
Performance: Its thermal conductivity (around 147 W/m·K) is lower than that of copper but sufficient for many applications, including battery cooling, motor housings, and standard electronic enclosures.
Cost & Printability: AlSi10Mg is cost-effective and prints reliably on standard LPBF systems, making it a popular and economical option for custom liquid cold plates.
CuCrZr
CuCrZr (Copper–Chromium–Zirconium alloy) is typically selected when aluminum alloys can no longer meet the required thermal performance. It is commonly used in high heat-flux applications such as silicon carbide (SiC) power electronics and AI processors.
Why use it: After heat treatment, CuCrZr offers exceptional thermal conductivity (>300 W/m·K), roughly double that of aluminum alloys. This makes it highly effective at removing heat from compact, high-power-density hotspots.
The trade-off: CuCrZr is significantly heavier (approximately 8.85 g/cm³) and more expensive. While it can be processed on standard infrared laser systems—unlike pure copper—it is still more challenging to print than aluminum and requires tighter process control.
Durability: Compared to pure copper, which can lose strength at elevated temperatures, CuCrZr maintains its mechanical strength and stability under demanding thermal conditions.
Detailed Comparison: AlSi10Mg vs. CuCrZr
To make the trade-offs easier to visualize, we have ranked both materials on a relative scale of 1 to 5 (where 5 is the best). The chart below shows at a glance how they differ in performance, weight, and cost.

For a deeper engineering analysis, the table below provides the specific technical specifications. Note that these values reflect the materials in their heat-treated state, representing typical high-performance conditions for strength and thermal conductivity.
Property | AlSi10Mg (Aluminum Alloy) | CuCrZr (Copper Alloy) |
|---|---|---|
Thermal Conductivity | Good (~147 W/m·K) | Superior (>300 W/m·K) |
Tensile Strength | ~300 MPa | ~543 MPa |
Yield Strength | ~180 MPa | ~432 MPa |
Elongation at break | ≥8% | ~21% |
Density | Low (~2.67 g/cm³) | High (~8.85 g/cm³) |
Printability | Excellent. High success rate on standard printers. | Challenging. Requires strict process control. |
Relative Cost | Lower | Higher |
How to Choose?
Choose AlSi10Mg if: Minimizing weight and cost is your priority, and the heat load is moderate. It offers a strong balance of low weight and mechanical stability.
Choose CuCrZr if: You are dealing with extreme power density (e.g., GaN or SiC devices). Although heavier, it is stronger, more ductile, and conducts heat and electricity far better than aluminum.
The Manufacturing Workflow
The production of an additively manufactured liquid cold plate follows a strictly controlled, step-by-step workflow.
1. Design for Additive Manufacturing (DfAM)
Engineers create the shape using 3D software. They must balance cooling performance with printability. This means using specific shapes (like teardrops) for internal channels so they don't collapse while printing.
2. Simulation & Verification (CFD)
Before printing, we test the design on a computer. Computational Fluid Dynamics (CFD) software acts like a virtual wind tunnel for liquids. It predicts how water will flow and catches problems—like dead zones where water gets stuck—before we use any metal.
3. Printing (Laser Powder Bed Fusion)
The design is sliced into paper-thin layers (30–60 microns). A powerful laser melts metal powder, layer by layer. This creates complex cooling channels inside the metal that standard tools simply cannot make.
4. Depowdering (Cleaning)
After printing, the internal channels are full of loose powder. This is a critical step. We use vibration, vacuum, and air blasts to remove every grain of dust. If this isn't done perfectly, the powder will clog the flow.
5. Post-Processing
Stress Relief: We heat the part in an oven to relax the metal. This prevents it from warping.
Cut-off: The part is cut off the machine's build plate, usually with a wire cutter (Wire EDM).
CNC Machining: We smooth out the connection points—like O-ring grooves—to ensure a perfect, tight seal.
6. Quality Assurance (QA)
Finished parts go through a pressure test to ensure there are no leaks. For critical aerospace or medical parts, we use CT Scanning (X-ray) to look inside and prove there is no trapped powder left.
Design Tips for 3D-Printed Liquid Cold Plates
Designing liquid cold plates for additive manufacturing requires a different mindset than traditional machining.
Instead of simply converting an existing design to a printable file, engineers should apply Design for Additive Manufacturing (DfAM) principles early to fully leverage the strengths of 3D printing while avoiding unnecessary cost and risk.
Here are the essential best practices:
1. Use "Self-Supporting" Channel Shapes
This is the most critical rule for printability. A 3D printer builds layer by layer. If you design a horizontal cooling channel with a round or square roof, it will collapse during printing.
The Fix: Change horizontal channels to a Teardrop or Diamond shape. These shapes have angled roofs (45 degrees) that stand up on their own.
Why it matters: It prevents the channel from collapsing and avoids the need for internal supports, which are impossible to remove.
2. Target Hotspots with "Turbulators"
Don't just drill a straight hole. 3D printing allows you to place complex textures exactly where the heat is highest (the hotspots).
The Fix: Add internal features like Pin Fins or Gyroid Lattices inside the channels. These shapes act as "mixers" (creating turbulence).
Why it matters: Turbulence forces the liquid to mix and grab heat much faster than smooth water. This dramatically boosts heat transfer efficiency exactly where you need it.
3. Ease the Flow
While turbulence is good for heat, you don't want to block the water flow too much. High resistance means your pump has to work harder, using more electricity.
The Fix: Replace sharp 90-degree turns with organic, sweeping curves.
Why it matters: Smoother paths reduce pressure drop. This means you can use a smaller pump and consume less energy (lower power consumption) for the whole system.
4. Use Software to Cut Weight
One of the biggest advantages of 3D printing is that you don't need a solid block of metal.
The Fix: Use Topology Optimization tools in your design software. This technology looks at your part and tells you where metal is needed for strength—and removes it where it isn't.
Why it matters: It reduces unnecessary material. You get a part that is lighter and cheaper to print, but still strong enough to handle the job.
5. Plan for Powder Removal
When printing ends, the channels are full of loose metal dust. If your design traps this powder, the cold plate will fail.
The Fix: Avoid "dead ends" or blind pockets. Ensure exit holes are large enough (ideally >2mm) so the powder can pour out freely like sand.
6. Simulate Before You Order
Never rely on guesswork. Once the part is printed, you can't see inside to fix it.
The Fix: Run CFD (Computational Fluid Dynamics) simulations on your computer first.
Why it matters: CFD acts like a "virtual X-ray." It predicts exactly how the water will flow, identifying "dead zones" (no cooling) and checking temperature distribution before you spend a penny on printing.
Cost Drivers for 3D-Printed Liquid Cold Plates
While additive manufacturing eliminates the need for expensive specialized tooling, the cost of a 3D-printed cold plate is dictated by a different set of variables.
Unlike traditional methods where volume is the primary price lever, metal AM costs are largely driven by machine time, material choice, and post-processing labor.
1. Material Choice & Volume
The metal powder itself is a baseline cost.
The Material: Standard aluminum (like AlSi10Mg) is cost-effective. High-performance copper alloys (like CuCrZr) are necessary for high-heat electronics but cost significantly more.
The Volume: The larger and heavier your part, the more powder it uses and the longer the laser takes to melt it.
How to Save: Use Topology Optimization software. This removes unnecessary metal from your design, reducing both the material bill and print time.
2. Design Complexity & Supports
People often say "complexity is free" in 3D printing, but that isn't entirely true.
The Hidden Cost: If your design has many overhangs, the printer must build Support Structures to hold them up. These supports use extra material and require manual labor to remove by hand.
How to Save: Apply DfAM (Design for Additive Manufacturing) principles. By using self-supporting angles (45° or steeper), you minimize supports. Less manual labor means a lower price.
3. Post-Processing Requirements
The part is not finished when it leaves the printer. It needs finishing work, and your specific requirements dictate the cost here.
Machining: Interfaces and sealing surfaces often need CNC Machining to fit perfectly.
How to Save: Be selective. Only request tight tolerances (high precision) on the surfaces that absolutely need them (like O-ring grooves). If a surface doesn't touch anything, leave it "as-printed" to save money.
4. Testing Standards (QA)
How much testing do you actually need?
The Standard: All cold plates typically undergo basic cleaning and pressure testing.
The Premium: Mission-critical parts (for aerospace or medical use) may require CT Scanning to look inside the channels.
How to Save: Choose the testing level that matches your industry. Don't pay for aerospace-grade inspection if you are building a prototype for a lab test.
For a deeper breakdown of cost factors in metal additive manufacturing, see our metal 3D printing cost guide.
Want a clearer estimate for your project?
Use our cost calculator to get an instant quote.
Conclusion
As AI servers, electric vehicles, and aerospace systems become more powerful, they generate more heat than ever before. Traditional manufacturing methods—like drilling straight holes or gluing parts together—simply cannot keep up.
3D printing is the solution. It has moved beyond just making prototypes and is ready for real production.
By using 3D printing, engineers can create "monolithic" (one-piece) designs that never leak. They can build complex internal channels that hug the heat source perfectly—something traditional machines can't do. The result is a liquid cold plate that is lighter, safer, and much more efficient.
New to Unionfab?
Get 10% off your first 3D-printed metal order and start building better cooling solutions today.

